User Management
Managing users: a guide for User Administrators

User Administrators can access all user management features from the Administration page.
Here's a breakdown of the options.
Users Page
View and manage user accounts on this page. See all active users, edit profiles, and quickly find accounts using the search box or column filters.
Clicking on a user record opens their profile page allowing you to
- Update their account details (name, email, company etc).
- Toggle their user sign-in type between 'Forms User' (username and password and/or MFA) or 'Service' (Single Sign-on).
Security Settings
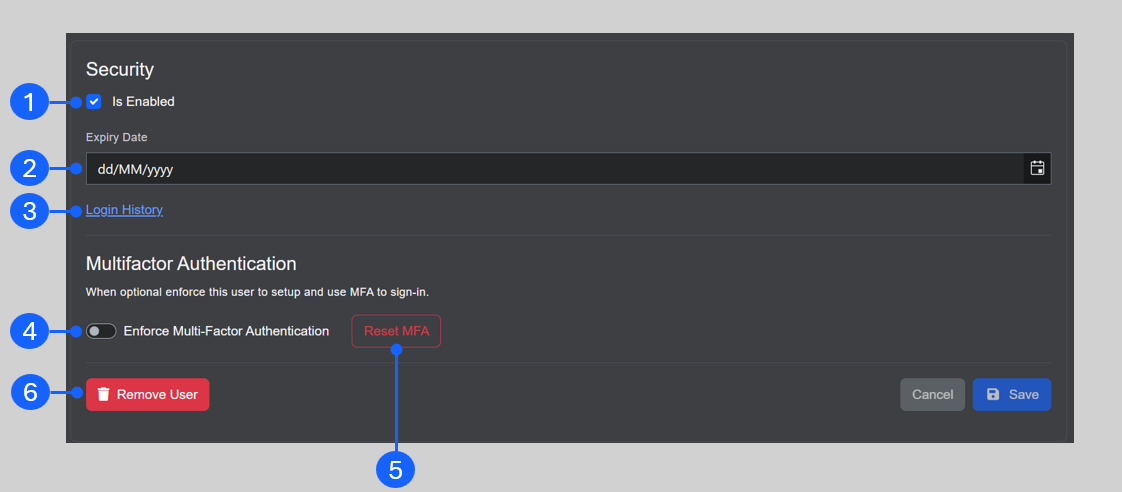
- If this option is ticked, the user can log in. If it's unticked, login attempts will result in an ‘Account is Disabled’ error.
- If time limited access is required for an account, set an expiry date for the users access here. After this date, when the user attempts a login, they will receive an 'Account has expired' error message.
- View a full list of the user's logins within the selected date range.
- Once enabled, the user will be required to configure MFA during their next login and must use it for all subsequent logins. This can be enabled for all users by default in the server settings (see Server Management).
- When MFA is enforced for a user, the ‘Reset MFA’ button makes them reconfigure MFA at their next login. When MFA isn’t enforced, the same button removes the MFA requirement from their account.
- The 'Remove User' button completely deletes the user from the R2S database, and they will need to re‑register if access is needed again.
Roles
A user’s role is set when their account is created and determines the feature and functions available to them in R2S. User Administrators can add or remove roles to a user's profile in this section, but only within the level of their own permissions. For example, they can assign the User Administrator role to others but cannot grant any role higher than their own.
Simply choose a new role from the 'Available' column and click the arrow button to move the role across to the 'Selected' column and click 'Save'.
The next time this user logs in their role will be updated. In this example, the user will now have access to the user management features in R2S. Similarly, roles can be removed from a user's profile, if required.
For more information on the available roles in R2S see this page.
User Administrators: If you need to update a user's role to a level you don't have access to, please contact our support team here.
Project Group Access
A user’s Project Group determines which projects they can choose from on the Project Selection screen when they log-in. User Administrators can add users to any of the available Project Groups, using the same steps as above.
Invites Page
Use this page to review the status of current invitations as well as invite new users (see Adding Users section).
The User Invites Page displays a list of all invitations that are currently in progress.

- Status: If an invitation is shown as Pending, it means the user has been sent an email invite but has not yet completed their registration. If they do not register within the required timeframe (typically one week), the invitation will automatically move to Expired. If the user tries to register after the invitation has expired, they will receive a notification informing them of this. They will then need to contact their User Administrator to request that a new invitation is sent.
- Resend Invite Button: this will resend the original invitation email, requesting them to complete registration.
- Cancel: If no response has been received from the user their invitation can be removed from the system. The invited user will not not be notified of the cancellation.
Requests Page
User Administrators who are set-up as Group Owners can access this page and manage user requests for the groups they own.
Requests are generated by
- Users inviting other colleagues using the Invite Button.
- A new user completing the request form.
- An existing user requesting a change to the Project Group they are in.
When a new request is made, an email is sent to the User Administrator that contains a link to the Requests Page.

- Approve - click this button to automatically send the new user an email with a link to complete their registration.
- Reject - the prospective user will be notified of the rejection by email along with a justification.
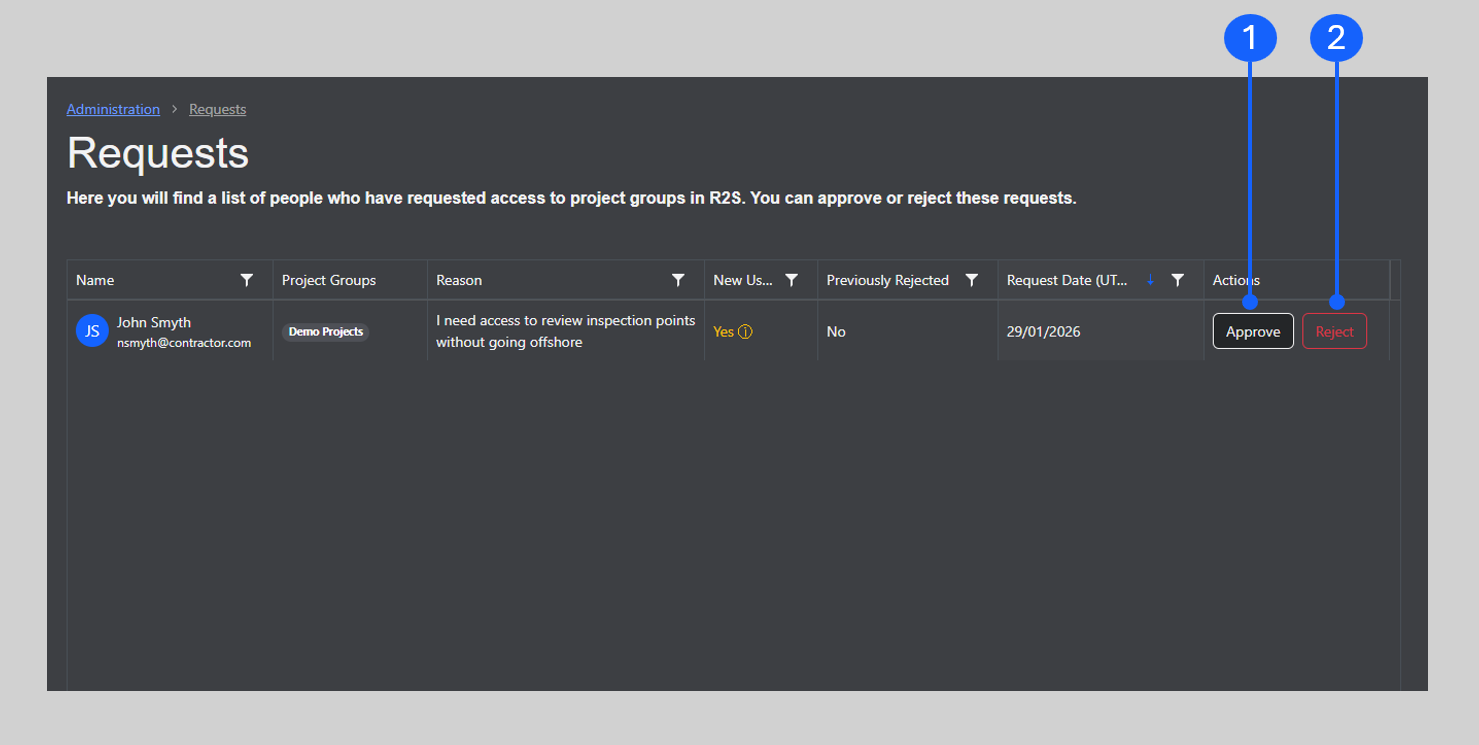
If approved, the user record will move to the Invites Page where it will be shown as 'Pending' until they have completed their registration.
Project Groups Page
A user’s Project Group determines which projects they can access on the Project Selection screen. This page allows Group Owners to manage the group across five separate tabs.
Group Details
- Edit the Group Name
- Enable/Disable if users can to request access to the group
- Enable or disable a group completely - users who are already in the group retain their access until the group is deleted.
Warning: If a User Administrator disables a group, they won’t be able to re‑enable it. Please contact support to have it re-enabled.
Projects
Displays a list of all the projects in the group. User Administrators are not able to edit the projects in the each group or generate new groups. To do this you must have the System Administrator role. Please contact support to request an update to your role.
Group Owners
Displays a list of all current group owners. A User Administrator can add additional group owners here.
Please note: group owners who do not have the User Administrator role will have restricted functionality on the Administration page.
Users in Group
Add, remove or invite users to the project group here.
Membership Requests
New requests for access to the project group can be reviewed, accepted or rejected from this tab.
Have a look at these related pages for further detail on managing R2S.
Adding Users
Server Management
My Account
If you are having trouble using any tool or feature in R2S please contact our support team here.