Introduction to the R2S Interface
Learn your way around the R2S project viewer.

Overview of the Project Interface
Note: We are continually improving R2S, some of these elements may move or change. Keep an eye on updates for more information.
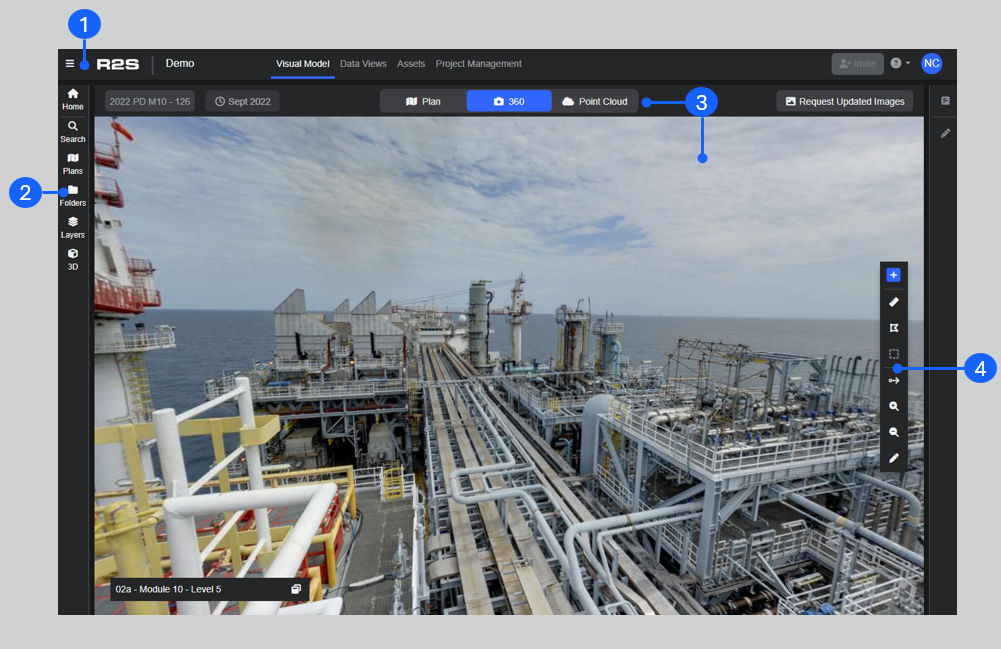
The main R2S interface consists of the Project Navbar (1), Side Panel Menu (2), Main Viewer Window (3) and Toolbar (4). These elements are always accessible no matter what your doing.
Project Navbar
The options available on the Navbar will vary depending on the role you have been assigned.
.png)
- Access to the Project Selection screen and the Administrator pages.
- R2S logo - provides quick access to the Project Selection screen.
- Project Name
- Visual Model - show visual information such as 360 images, point clouds and plans
- Data Views - view all the tags and tasks in a list view (see Data Views page).
- Assets - show information about each piece of visual information (we call these 'assets') that is contained in the visual model, in a list format (see Assets Page).
- Project Management - manage datasets, 3D components and other project options
- Invite button - allows you to easily invite a colleague to R2S
- ? Menu - link to the support pages
- Personal Preferences - access to your account detail and preferences.
Side Panel Menu
You can manage your view, navigate the visual model and search/filter tags and tasks using this menu. Click on the icons to open a panel with the available functions, click the icon again to close it.
.png)
Please note: The 3D option is only available when component models are included in your visual model.
- Home - returns you to the project title screen
- Search - allows you to search for tags, annotations or by XYZ coordinate (see Searching).
- Plans - shows a list of all the plans in the project, ordered by elevation (see Navigation).
- Folders - shows all the visual data that makes up the Visual Model, structured into folders/subfolders. Here you can search for specific plans, 360 images and other visual data (see Folders Panel).
- Layers - allows you to toggle on/off different layers of information in the project, helping to clear up the view and display only the data you're interested in (see Layers Panel).
- 3D - this panel allows you to search for specific elements of 3D components contained in the project.
Visual Model Viewer
This is the main area in R2S for interacting with the visual model and data contained within it. You can navigate around the visual model, change your display mode, select tags to see more information and use tools such as measurement and markup. For more information see Navigation.
Viewer Bar
This top bar provides supplementary information to the view you are currently in, as well as the buttons for changing the main view.
.png)
- Asset name - This displays the name of the current asset (piece of visual information) being displayed.
- Date - when displaying a 360° image or point cloud, this shows the date of capture.
- Archive
- In 360° image - when this button is active, you can access Archive Mode. A timeline will appear at the bottom of the Main Viewer Window allowing you to view older images taken at the same location.
- In Plan Mode - you can change to seeing individual survey dates, or select 'Latest 360's' to show you only the most recent images across the level.
- View Mode - This is where you can change between the main view modes of plan, 360° image or point cloud.
Toolbar
The tools available vary depending on the view mode you are in. Depending on your permissions, some options may be greyed out or not visible at all.
.png)
- Add new tag.
- Measure - opens the Measurement Panel (see Measurement Overview).
- Markup - opens the Markup Panel (see Markup Tool).
- Selection tool.
- Zoom in/out.
- Edit mode.
- Hotspot Range View Settings.
- Toggle upper/lower image view
- Crop and export point cloud (see Crop and Export).
- Point cloud viewer settings (see Point cloud settings).
See these related pages for more overview information on the R2S interface
Navigation
Tag Panel Overview
Note: If you need any more help with a specific action, please get in contact.